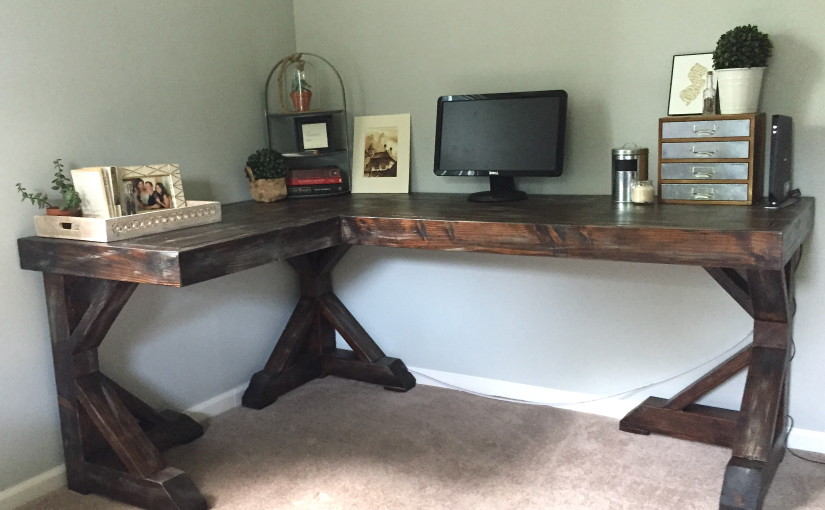
The first room I was ecstatic to do in our home was the office on the first floor. Within a month of owning our house, I had stripped the wallpaper and painted the walls. Long story short, we wanted this room to be an office for both my husband and myself and an extra TV room. So we needed two desks, a couch and a TV. With our new homeowner spirit, we quickly went out shopping for desks. Well, guess what? Desks are freaking expensive!! Plus, I couldn’t find what Mark and I were imagining in our heads. With all the initial enthusiasm squashed, this room paid the price and sat empty for a while.

About a year after we bought the house I decided to try my hands at my first DIY/Ikea hack in an attempt to get this office going. I re-did my college Ikea desk and loved it, so I went to the scratch and dent section at Ikea and bought two more table tops (which I didn’t wind up using) for about $20 to make an “L” shaped desk as the second desk. Over the next 6 months, my ideas kept changing and I found some inspiration on Pinterest. Finally, I stumbled across free desk plans on Instagram. Thank you Rogue Engineer! With the plans, the “L” shape, my Pinterest inspiration, and some pallets, I was finally ready to get started.
I started to drill my pocket holes and assemble the desk top. This turned out to be the most difficult part of the whole project. At this point, I had never drilled a pocket hole and I went slowly. Partially due to my inexperience, my stagger-as-I-go technique, and the fact I had to finish each pocket hole by hand because I did not have a long enough drill bit, this part took several days spread over weeks. What a newb!

Finally, I was ready to buy the wood for the legs and move on from the top! When I was having the guy at HomeDepot cut the legs, they seemed short, you know, to me, the super not experienced desk maker. I added an inch or two, figured I would double-check it, and could cut them down later if needed. In the end, I left the legs longer, which would come back to bite me. . . . The legs came together pretty quickly, despite the fact I only have a single Kreg Jig mini. I used both the plans and tips from Rogue Engineer and Shanty2Chic. After some mistakes I made on another project, I understood how to adjust the Kreg Jig to work for different widths of wood. I was super proud of myself with these legs!

I assembled everything another day and had my husband help me align the top to the frame better. Because I adjusted the plans to make this a corner desk, I kind of just made up where to place the under-support and prayed everything would work in the end. I sanded it all and moved it into the back sunroom to stain.

I used a combination of Minwax’s Jacobean, Espresso, and Provincial stains and weathered it with some paint samples I had lying around. Then sealed the whole thing with Varathane’s triple-thick polyurethane.
When the time finally came to move it into the office, the desk did not fit! For the record, I did measure the door we had to fit through and did some quick measuring in my head, thought it would work. I was wrong. Some time, sweat, and removed door jamb later, the desk was in!
I just love this desk! From plan to completion this was a long time coming—more than 3 months!! And if you count all the Pinterest searching way more than 3 months! But boy, was it worth it! Now, if we ever move, the desk stays!
Also Read:
- Expert Tips for Reducing Tree Pruning Cost
- Is it Worth Hiring a Level 5 Arborist Sydney for Development Applications?
- How Custom 3D Christmas Ornaments Are Used for Seasonal Branding
- Rodent Removal Sydney: What Happens During a Full House Inspection
- Rat Control Sydney Explained: How Bait Stations and Traps Differ
